

Welcome to a new month of the Thursday Challenge from Create with Connie and Mary. The color challenge this month is just “Peachy!”
The Challenge:

The Card:
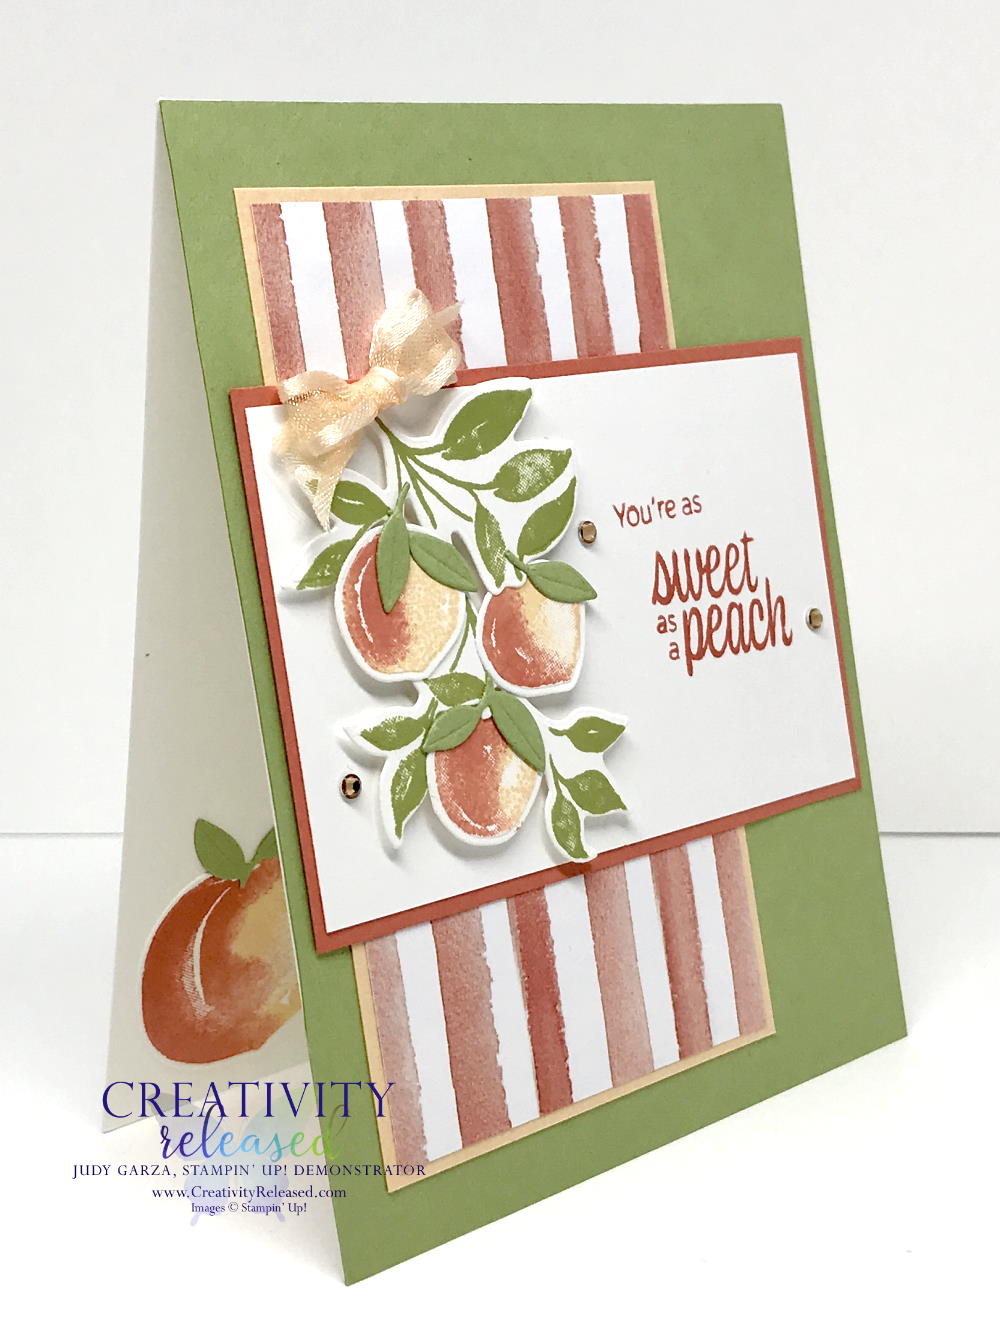 Oh MY! I love this stamp set and the designer series paper that goes with the suite of products found on page 61 of the 2021-22 Annual Catalog. The stamps and colors are so springy, uplifting, and peachy! I had a bit of a challenge making this weeks’ card. Read to the very end to see the first try.
The Measurements and Details:

The Measurements:
- Basic White CS – 4 1/4″ x 11″ scored and folded at 5 1/2″ and 3 7/8″ x 2 1/2″ along with various sizes of scraps to stamp and die-cut.
- Pear Pizzazz Cardstock (CS) – 4 1/4″ x 5 1/2″, 2″ x 2″ scrap to die-cut
- Pale Papaya CS – 2 3/4″ x 4 3/4″
- Calypso Coral CS – 4″ x 2 5/8″
- DSP – 2 5/8″ x 4 5/8″
The Peachy Details:
I inked up the peaches with Pale Papaya ink then added Calypso Coral ink to the stamp with a sponge dauber. I love the way they turn out and, it was surprisingly easy. The leaves were all stamped or die-cut using Pear Pizzazz paper and ink. Then, it was just a matter of assembling. I used dimensionals to add the images to the card front and stamped the sentiment with Calypso Coral ink.
The Inside:

The Peachy theme was carried to the inside of the card using the same inks as on the card front.
Finishing Touch:

I added a few Champaign Rhinestone Jewels to the focal point, and a Pale Papaya bow to the peach branch for the finishing touches. Now, remember I told you about having a “challenge” making this card? Well, the first card was on a Pear Pizzazz card base. Once I had it finished, this is what I found:
 DANG! Have you ever done that? I guess I was in a hurry, huh? So, to correct the “problem,” I cut the card in half and glued the card front to a new Basic White Thick card base. It worked out well because I really like how the white inside shows off the sentiment and large peach. Here’s wishing you a Peachy Day! Now it is time for you to go HERE to see what the other design team members have to show you.
Then, why not join the fun and take the challenge? Please post it on https://www.facebook.com/CreatewithConnieandMary/
Product List
")


 Designer Series Paper")


 Open Weave Ribbon")


 Follow me!
- To shop in my online store, click here.
- Access & view the current catalogs, Click here.
- To subscribe to those fun Paper Pumpkin kits of creativity, Click here.
- Learn about my Loyalty Rewards Program where you can earn free stamps just from shopping with me; click here.
- Follow me on Pinterest; click here.
- Click here to follow me on Facebook!
- To follow me on YouTube, Click here.
- Please subscribe to my blog, too, by adding your name and email address in the right sidebar under the Subscribe image and clicking the sign-up button.
Four for Forty - FREE TUTORIAL
Free with any $40+* purchase *before tax and shipping
I will send this FREE Tutorial via email on or around the first of the following month.
- All projects feature the One More Year stamp set 164777.
- This offer is only through me, Judy Garza.
- This free tutorial is not available for purchase.


your peaches are perfect! Look delicious 😋
Thanks, Leslie! The stamps did all the “work.” They are very easy to work with!
Both cards are beautiful! The designs are “peachy keen” Gayla
Cute comment! I had a lot of fun playing with this set!