
 Hello! I am happy to introduce my first-time-ever 12 Weeks of Christmas blog post. Every week until Christmas, I will be emailing a holiday card or a “giftable” project (3D) and maybe even some gift wrapping, tags, or treat holders. So, if you want to receive the full 12 Weeks of Christmas, be sure you are subscribed to my blog to get the emails. I designed this card using the Mojo Sketch 543 challenge. I like these sketches because the measurements are included.
  Without further ado, here is…
The Card
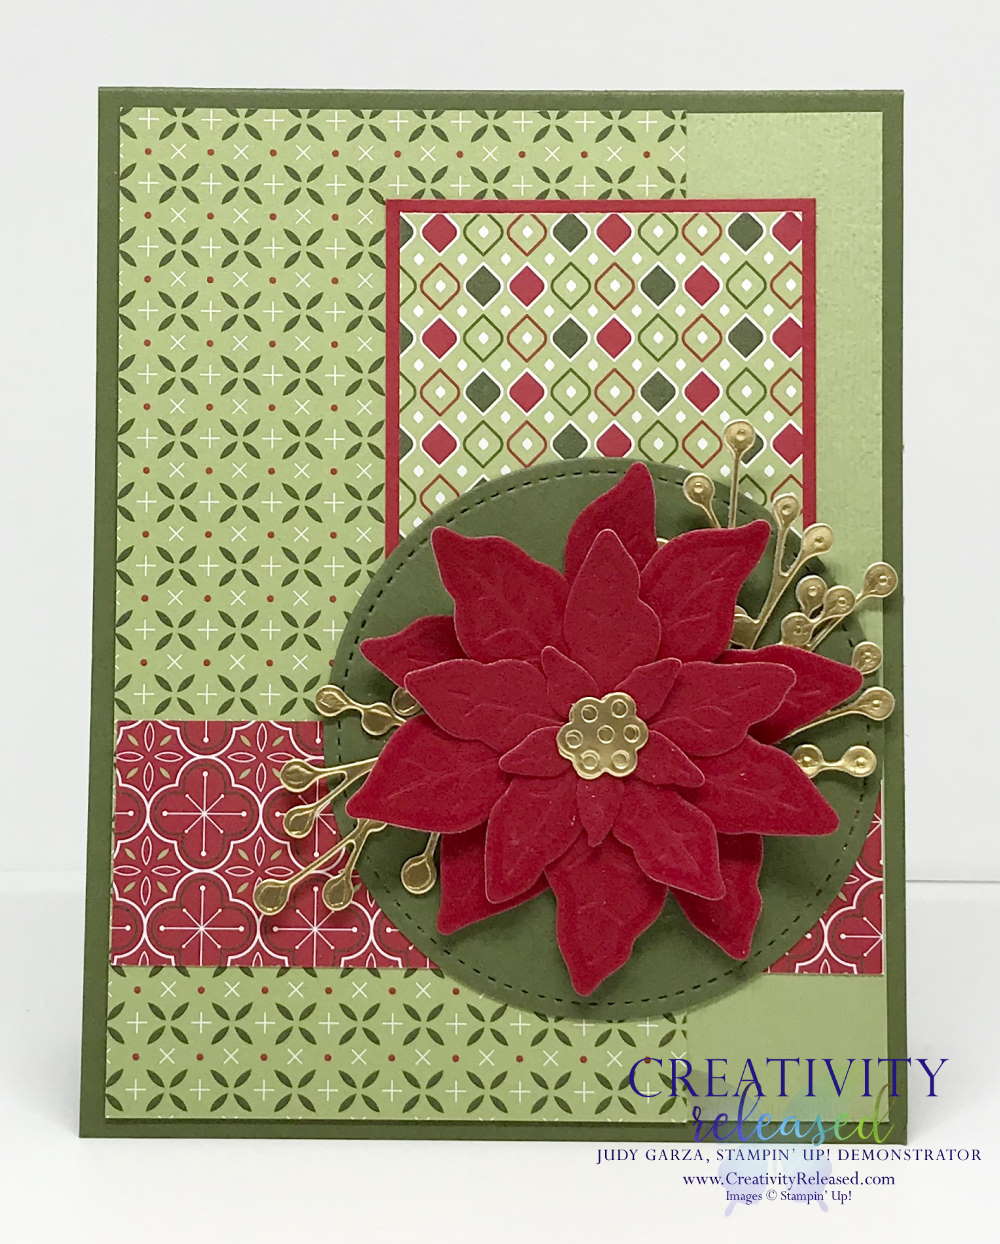 The Poinsettia Petals Bundle is one of my favorites in the August-December 2020 Mini Catalog. When I saw the Mojo 543 sketch, the poinsettia which is made with Red Velvet cardstock, just had to go in that circle!
Details CUTTING AND SCORING
- Card Base – Mossy Meadow Cardstock (CS) – 4 1/4″ x 11″ scored and folded at 5 1/2″
- Layer 1 – Pear Pizzazz CS – 5 1/4″ x 4″, embossed with Subtle 3D Embossing Folder
- Layer 2 – DSP – 3″ x 5 1/4″
- Layer 3 – DSP – 1 1/4″ x 4″
- Layer 4 – DSP 2 5/8″ x 2 1/8″ adhered to Read Red Cardstock (CS) 2 3/4″ x 2 1/4″
- Layer 5 – Mossy Meadow CS – 3″ square, die-cut with the largest Stitched Shapes circle.
- Layer 6 – Gold Foil Sheets – 1 1/2″ x 8″, die-cut with Poinsettia sprigs and center
- Layer 7 – Red Velvet CS – 2 3/4″ x 7 3/4″, die-cut with Poinsettia dies
Optional:
- Inside Layer 1 – Real Red CS – 5 1/4″ x 4″
- Inside Layer 2 – Pear Pizzazz CS – 5″ x 3 3/4″
- Inside Layer 3 – Whisper White CS – 4 3/4″ x 3 1/2″
- Inside Layer 4 – DSP – 5/8″ x 3 1/2″
 Here is a look at the “optional” inside of the card. It is just one idea. Of course, it could be simplified by omitting the Pear Pizzazz layer and the strip of DSP.
Instructions:
- Adhere Layer 2 to the embossed Layer 1 then to the card front.
- Adhere Layer 3 about 3/4″ from the bottom of Layer 1.
- Adhere Layer 4 directly above Layer 3 and about 1/2″ in from the right of Layer 1.
- Die-cut and emboss Layer 7 – 2 medium, one small, and 1 tiny individual poinsettia die. Layer the 2 medium with a dimensional. Add the small and tiny layers with Mini Glue Dots. Adhere to Layer 5 with glue or glue dots. Add to the card front as shown.
- Die-cut Layer 6 – three sprigs. Trim to make shorter then, tuck under and adhere under the poinsettia. Die-cut both the solid and detailed centers. Glue together then to the center of the poinsettia.
Optional inside:
- Use Real Red ink to stamp the sentiments onto Layer 3.
- Adhere stamped Layer 3 to Layer 2 to Layer 1 then to the inside of the card.
- Add Layer 4 to the bottom of Layer 3.
I hope you enjoyed my card for the first project in the new 12 Weeks of Christmas! I aim to post the 12 Weeks of Christmas projects each Friday. Please let me know if you have any questions. Below is a list of products that I used to make this card. Click on any item you need to be taken directly to my online store.
Product List
")
")


Four for Forty - FREE TUTORIAL
Free with any $40+* purchase *before tax and shipping
I will send this FREE Tutorial via email on or around the first of the following month.
- All projects feature the One More Year stamp set 164777.
- This offer is only through me, Judy Garza.
- This free tutorial is not available for purchase.
- To shop in my online store, click here.
- Access & view the current catalogs, Click here.
- To subscribe to those fun Paper Pumpkin kits of creativity, Click here.
- Learn about my Loyalty Rewards Program where you can earn free stamps just from shopping with me; click here.
- Follow me on Pinterest; click here.
- Click here to follow me on Facebook!
- To follow me on YouTube, Click here.
- Please subscribe to my blog, too, by adding your name and email address in the right sidebar under the Subscribe image and clicking the sign-up button.


